Comparing Power BI Free vs. Pro vs. Premium
Power BI For Free: Comparing Power BI Free vs. Pro vs. Premium
Whether selecting the appropriate Power BI subscription for individuals or businesses, this guide analyzes the Power BI Free, Pro, and Premium plans. We’ll explore the key differences, a features matrix, and a Power BI license guide, and share some tips on signing up for Power BI if you need a work email address.
Power BI caters to individuals and organizations of all sizes, from small businesses to global enterprises. However, with multiple subscription plans available, it can take time to determine which one best suits your organization’s needs and budget. One key point that gets lost is that you do not have to be a large organization to use this tool to gain insights.
For those new to it, the Power BI login process can be one of the initial obstacles. The biggest blocker is that Power BI does not support personal email addresses for signup.
Note: If you encounter the issue that Power BI does not support personal email addresses for a signup, you can see the section, How do I sign up for Power BI if I do not have a Work Email address? below for options for signing up with a non-work or non-school account such as; outlook.com, hotmail.com, gmail.com, and others.
List the Pros and Cons of making your choice.
1. How to Choose the Right Power BI Subscription
When considering subscription options, it is essential to evaluate the features and capabilities necessary for data analytics projects, budget constraints, and team size. This section will guide you in making decisions regarding the appropriate subscription plan.
Determine Your Analysis Needs
To begin, it is important to assess your data analytics needs, including the complexity of your data, the degree of teamwork required, the preferred frequency of data updates, and the size of your datasets. Considerations include:
Do you need to collaborate with other users or share reports and dashboards?
How much data storage and processing capacity do you require?
Is access to advanced AI and data analytics features essential for your projects?
Do you need dedicated cloud capacity for improved performance?
For scale, how many times will the report or dashboards be accessed?
What are the 4 Power BI Subscription Plans?
Once you have assessed your needs, we must compare the features and pricing of different Power BI subscription plans. As discussed in the previous section, there are four main account types: Power BI Free, Power BI Pro, Power BI Premium, and Power BI Premium Per User (PPU).
Power BI Free is best suited for individual users who want to explore Power BI’s features without the need for collaboration or advanced features.
Power BI Pro is ideal for individual users and small teams requiring advanced features, collaboration capabilities, and frequent data refreshes.
Power BI Premium is designed for organizations that need dedicated cloud capacity, enhanced performance, and advanced analytics capabilities.
Power BI Premium Per User allows you to use various features of Power BI Premium when you do not need the dedicated capacity features of PPU.
Consider your budget
Power BI has different subscription plans with varying prices. Select a plan that matches your budget and project requirements. Power BI Pro and Power BI Premium offer monthly or annual billing, with discounts for yearly commitments. If you’re unsure about a paid subscription, start with a free trial of Power BI Pro to evaluate its features and determine if the platform meets your needs.
Information about Power BI Trials
Enrolling in a complimentary trial of the paid version of Power BI Premium Per user or Power BI Pro to obtain an individual license is an option. These trials generally last for one or two months. If the upgrade is not purchased after the trial concludes, the license will revert to the free or Pro version based on the one used before the trial began.
Reevaluate Your Choice over Time
What happens if your project is successful !!! Your data analytics needs will evolve.
You must regularly reevaluate your subscription choice to ensure you have the right plan to support your projects. Remember that you can always upgrade or downgrade your subscription plan as needed.
All account types allow you to create reports and analyses. The critical difference is collaboration features and scale.
2. Understanding different Power BI Account Types
Microsoft offers four main types of Power BI accounts to cater to different users’ needs, ranging from individual users to large organizations. Each account type comes with its own set of features and pricing plans. In this section, we will help you understand these account types and make an informed decision about which one is the best fit for your requirements.
Power BI Free
The Power BI Free version is tailored for individual users who want to generate reports and visualizations with their data, yet it does come with certain restrictions. This account option is intended for users who wish to test out the capabilities of Power BI without paying for a subscription.
Note: I use this version when I work on some visualizations and training where I do not want to use my corporate instance in a more public setting. When I left Microsoft, I was able to enable a Pro version trial, 60 days, and converted this to a paid subscription that I use to this day. See the following for US Pricing.
Power BI Pro
Power BI Pro is a subscription-based service for individual users and small teams requiring advanced features and collaboration capabilities. You can publish content to other workspaces, share dashboards, and subscribe to dashboards and reports. It is mainly for businesses, as you scale to the ability to share with users who have a Pro license.
This license offers a 60-day free trial, after which you will need to purchase a subscription to continue using the service.
Power BI Premium – Capacity
Power BI Premium is intended for organizations that need dedicated cloud capacity, improved performance, and advanced analytics features. This subscription level is available monthly or annually and designed to scale with your organization’s needs.
Power BI Premium – Per User
Power BI Premium Per User is a powerful and cost-effective analytics solution that allows organizations to quickly build interactive reports and dashboards. The trial gives users an individual license and a per-user cost model that gives them access to the full suite of features. These include ad hoc analysis, data modeling, and sharing capabilities. In addition, power BI Premium has dedicated cloud capacity, whereas Per-User allows you to use various features when you do not.
What is the difference between Power BI Premium and Power BI Premium Per User?
Power BI Premium is designed to cater to self-service and enterprise-level business intelligence needs. It used to be priced based on capacity, making it less accessible for individuals and small teams. To address this, Power BI introduced Premium Per User (PPU), offering premium features at a more affordable per-user licensing model.
PPU includes all Power BI Pro features and exclusive premium features like paginated reports and AI capabilities. Unlike the capacity-based pricing of Power BI Premium, Premium Per User is priced per individual license.
Power BI Account Type Feature Matrix
When considering Power BI account options, it is important to evaluate your specific data analysis requirements and financial resources. Then, both individual users and companies can find a suitable account type that meets their analytical needs.
See Pricing & Product Comparison | Microsoft Power BI for up-to-date information
Here is a summary table of the different Power BI account types, key features, and pricing options.
| Account Type | Key Features | General Cost |
|---|---|---|
| Power BI Free | Access to Power BI Desktop, connect to various data sources, create and share interactive reports, limited data refresh capabilities. – Access to Power BI Desktop, the powerful report-authoring tool – Connect to a variety of data sources – Create and share interactive reports – Limited data refresh capabilities – The limitations are that Power BI Free does not offer collaboration features like sharing dashboards or reports with other users. – You must have a “Work” account (More detail below on how to solve this) |
Free |
| Power BI Pro | Share dashboards, reports, and datasets with other users collaborate in real-time using Power BI apps, access advanced data modeling and visualization features, schedule automatic data refreshes, and increased data storage and capacity. – Share dashboards, reports, and datasets with other users – Collaborate with your team in real-time using Power BI apps – Access advanced data modeling and visualization features – Schedule automatic data refreshes – Benefit from increased data storage and capacity |
$US10 /User/Month See Pricing & Product Comparison | Microsoft Power BI for up-to-date information |
| Power BI Premium Per Capacity | Dedicated cloud capacity for faster data processing, on-premises data gateway for secure data access, advanced AI capabilities and data analytics features, enhanced data storage and capacity, and premium support from Microsoft. This account type offers all the features of Power BI Pro while adding the following; – Dedicated cloud capacity for faster data processing – On-premises data gateway for secure data access – Advanced AI capabilities and data analytics features – Enhanced data storage and capacity – Premium support from Microsoft |
from $US4,995 Per capacity/month. Pricing varies based on capacity and features needed See Pricing & Product Comparison | Microsoft Power BI for up-to-date information |
| Power BI Premium Per User | Full suite of features, including ad hoc analysis, data modeling, sharing capabilities, etc. – Requires a Power BI Pro license for publishing content into Power BI Premium capacity. – Enable autoscale with your Azure subscription to automatically scale Power BI Premium capacity. |
$US20 /User/Month See Pricing & Product Comparison | Microsoft Power BI for up-to-date information |
Power BI Account Type Feature Matrix
*Prices are an estimated $US at the time of publishing.
See Link
3. How do I sign up for Power BI if I do not have a Work or School Email Address?
If you encounter the issue that Power BI does not support personal email addresses for a signup, you can try the following solutions:
Use a work or School email address: Power BI is designed primarily for business use, requiring users to sign up with a work email address. If you have a work email address associated with your organization, consider using that for signup.
Contact your organization’s IT department: If you are part of an organization that already uses Microsoft services, your organization’s IT department may be able to provide you with a work email address or assist you in setting up a Power BI account using your existing credentials.
Create a Microsoft 365 account: If you do not have a work email address, you can create a new Microsoft 365 account with a custom domain. Microsoft 365 offers a variety of business plans, and signing up for a Microsoft 365 account will give you access to a custom domain that can be used for your Power BI account. Visit the Microsoft 365 Business Plans page to explore available options.
Sign up for Power BI with a new Microsoft 365 Trial: You can sign up for a Microsoft 365 trial, which allows you to create a work account. You can use that new work account to sign up for the Power BI service. You can use Power BI even after the Microsoft 365 trial expires.
Sign up for a trial using a temporary work email address: Some temporary email services provide work email addresses with custom domains. You can use such an email address to sign up for a trial version of Power BI. However, this method may not be reliable in the long run, as temporary email addresses can be deactivated or blocked. It is also important to consider the security and privacy implications of using a temporary email address for sensitive data analysis.
Create a Domain and Email Service: The next section details the Domain hosting provider solution that I use.
Remember that signing up for Power BI using a work or school email address or an email address associated with a custom domain is the best approach, as it ensures a seamless experience.
Sign up for an Email service that lets you host your own domain name.
One effective solution I use to address the issue of Power BI not allowing personal email addresses for signup is to acquire a custom domain email address through a domain service like Hover (not sponsored). Registering a custom domain and setting up an associated email address allows you to create a professional, work-like email address to sign up for Power BI and other business-oriented services.
I have found Hover, a domain registrar I have used for years. They make it easy to purchase a custom domain and set up email addresses with that domain. To get started, follow these steps:
Step 1 – Visit Hover’s website
Visit Hover’s homepage to search for a suitable available domain for your requirements. Many domain extensions are available, allowing you to find the most appropriate option for your brand or personal needs. You can use this email address for many things, so take some care in selecting what you want to use. You can use this email address to give your emails some consistency throughout your career.
Step 2 – Purchase the Domain
To purchase a domain, add it to your cart and complete the necessary steps. This includes creating an account with Hover and providing your billing information.
Step 3 – Set up email forwarding or a mailbox
Upon completing the domain purchase, proceed toward Hover’s email services section. You will have the option of either setting up email forwarding or creating a dedicated mailbox. Email forwarding enables you to forward emails received at your personalized domain email address to another email address, such as Gmail or Outlook.com.
Alternatively, a dedicated mailbox offers a separate custom domain email address inbox. You can access it through webmail or an email client. The email hosting is an additional cost with the domain. For example, see this link for instructions on setting up various email clients to work with your Hover Mailbox.
Step 4 – Configure your email settings.
Follow Hover’s instructions to configure your email forwarding or mailbox settings. Once you’ve set up your custom domain email address, you can use it to sign up for Power BI and enjoy the benefits of a professional, work-like email address.
Using a domain service like Hover, you can create a custom domain email address that meets Power BI’s requirements for a work email address. This allows you to access Power BI and adds professionalism to your online presence, which can be beneficial in various business contexts.
4. Tutorial: Creating Your Free Power BI Account
The tutorial provides a guide on creating a no-cost Power BI account and utilizing the Power BI Free account. Creating a free Power BI account can provide a low-pressure opportunity to familiarize yourself with the platform, whether you’re experienced with data analytics or just starting your journey.
Signing up for a Power BI account
To begin, the initial step is to register for an account. This procedure is uncomplicated. The following are the step-by-step directions for establishing your Power BI account:
Step 1 – Visit the Power BI website
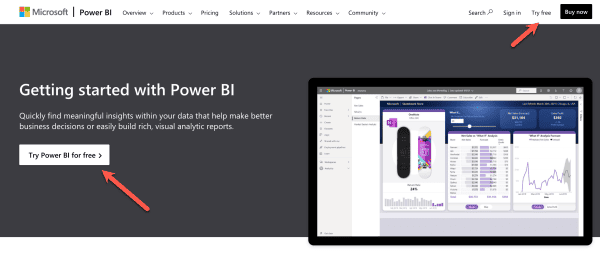
To begin the process, go to the Power BI homepage and proceed with the signup process.
Select Start Free or Sign-In if you have an account.
Step 2 – Choose a subscription
Power BI has multiple subscription options, including a free trial of Power BI Pro. Additional trials will be discussed later in the post. To begin with, select the “Try Power BI for free” button.
Step 3 – Supply your email address.
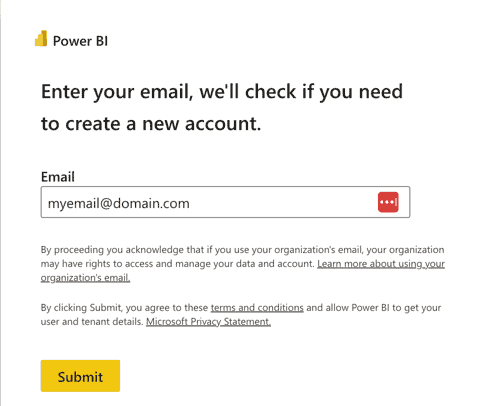
Enter your work or school email address in the provided field. Please note that Power BI does not support personal email addresses (e.g., Gmail, Yahoo, or Outlook.com) for signup. (See the section above for options if you need a non-work account.) Click on “Submit” to continue.
Step 4. Verify your email address.
This will only work if you are using a work email address. If the email address is from a domain, you are then asked to select from two options. If you select “It’s my personal email,” the screen will reset, and you will have to select another email. You will continue to the next verification steps if you select “I got it from my organization.” After entering your email address, click “Next,” and you will be shown a Phone verification section.
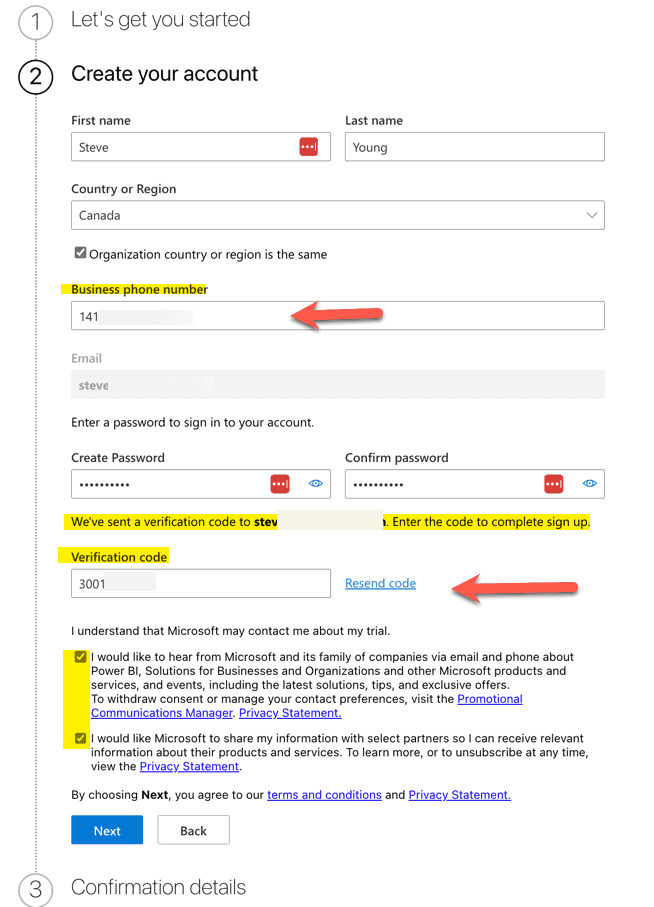
As shown below, enter your phone number, and you have the option to get a text or a phone call. Once you click Next, you will get a text message to validate your account via a phone number.
Enter your Phone number for a text message code.
A Verification Window will appear—type in the Code.
Enter the number you received from the text or phone call.
Step 5. – Fill in the form to create your account.
Complete the signup form: Fill in the required information, including your name, company name, and password. Be sure to create a strong password to ensure the security of your account.
There will be a validation email sent to the email address you entered. Enter the verification code into the box provided
Accept the terms and conditions: Read the Microsoft Power BI terms and conditions, and if you agree, check the box to confirm your acceptance.
Click “Next” to continue.
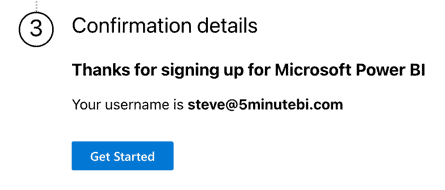
Step 6- Finish the signup process.
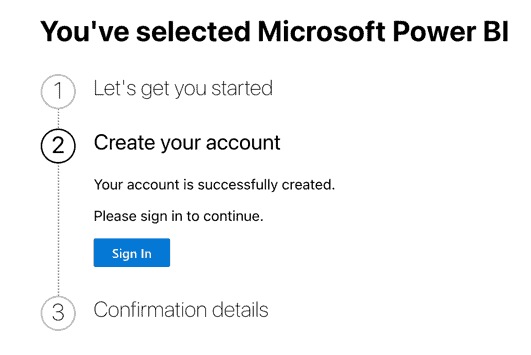
Click on the “Sign IN” button to complete the signup process. You will be redirected to the Power BI dashboard to explore the platform and its features. NOTE, this will sign you in automatically as you provided the Email and Password in step 5.
Step 7 – Get Started!!
You can click here to get started.
Success !!!! We now have a Free Power BI Account. We will use this in the examples below.
Step 8 – Check your Version
Your Power BI screen will have a title bar on top which has a circle where your profile picture would be. This will pop out the user information. You can also start a trial by selecting that option button, but wait until you are ready and have time to test it out. You don’t want to start a trial and then not have enough time to try it out.
If you have made it this far, congratulations; you have successfully signed up for a Power BI account. Check out some of the resources below.
Conclusion
By carefully assessing your needs, comparing subscription plans, and considering your budget, you can choose the suitable Power BI subscription plan for your data analytics projects. With the appropriate subscription, you’ll be well-equipped to harness the power of Power BI and find a plan that meets your budget.
How to Use Free Microsoft Office Online
Did you know that you can use Microsoft Office Online for free? Yes, you read that right. You can access the web-based version of Word, Excel, PowerPoint, and more. All you need is a Microsoft account and an internet connection. Easily create, edit, and share documents, spreadsheets, presentations, and more. You can also collaborate with others in real-time and sync your files across your devices. The linked blog article will show you how to set up the free Office Online in a few simple steps and give you some benefits and limitations.
Resources
For more information, see the documentation: Sign up or purchase the Power BI service as an individual – Power BI | Microsoft Learn.
Thanks.


